
Your Ultimate API Integration Tutorial
Your Ultimate API Integration Tutorial
An API integration tutorial is all about showing you how to connect two (or more) applications using their Application Programming Interfaces, or APIs. The whole process really boils down to three key things: authenticating securely, making requests to an API endpoint, and then correctly handling the data you get back. Getting a handle on this is absolutely fundamental for building modern software.
Why API Integration Is a Core Developer Skill

If you need any convincing, just look at the numbers. The chart above shows the massive growth expected in the API management market. When a market expands this fast, it's a direct signal of a rising demand for developers who can skillfully build and manage these connections.
In today's software world, apps rarely live in a bubble. They constantly need to talk to each other, share information, and trigger actions in other systems. APIs are the glue that holds it all together, acting like digital messengers that let different platforms cooperate.
Think about the apps you use every single day. When your ride-sharing app pulls up a map, it's hitting a mapping provider's API. When you buy something online, a payment gateway's API is what securely processes your credit card details. This power to pull in external services is what lets us build amazing, feature-rich applications without having to reinvent the wheel every single time.
Before we get into the nitty-gritty, let's make sure we're all on the same page with some key terms. Think of this table as your quick-reference guide for the concepts you'll see throughout this tutorial.
Key API Concepts at a Glance
| Concept | What It Means for Your Integration |
|---|---|
| API (Application Programming Interface) | This is the set of rules and protocols that allows your application to request information or actions from another service. |
| Endpoint | A specific URL where an API can be accessed. Each endpoint corresponds to a particular function or data set (e.g., /users or /products/123). |
| Request | The message your application sends to an API endpoint to ask for something. It includes the method (GET, POST, etc.), headers, and sometimes a body. |
| Response | The data the API sends back after receiving your request. It usually includes a status code (like 200 OK or 404 Not Found) and the requested data. |
| Authentication | The process of proving your application's identity to the API. This is often done with an API Key or an OAuth token. |
| JSON (JavaScript Object Notation) | The most common data format used for sending and receiving data through APIs. It's lightweight and easy for both humans and machines to read. |
Having these definitions handy will make the following steps much clearer as we start building our integration.
The Business Value of API Mastery
Knowing how to integrate APIs isn't just a cool technical skill; it has a real-world impact on the business. It leads to dramatically faster development because you can plug in specialized, pre-built functionalities instead of building them from scratch. That's a direct line to saving serious time and money.
By integrating with the right services, you can create much richer user experiences. For instance:
- Add social logins from Google or Facebook to your app.
- Integrate a shipping provider's API for live package tracking.
- Connect to a financial data API for real-time stock prices.
This skill is like being able to stand on the shoulders of giants, mixing and matching best-in-class services to build something truly great. This is exactly why being proficient with APIs has gone from a "nice-to-have" to an absolutely essential skill for any serious developer.
Key Takeaway: The ability to integrate APIs is no longer just a coding task. It's a strategic skill that enables faster innovation, enhances product value, and gives businesses a competitive edge by connecting to a broader ecosystem of services.
Market Growth and Developer Demand
The industry's reliance on these connections is fueling explosive growth. The global network API market, valued at USD 2.25 billion in 2025, is projected to skyrocket to around USD 72.14 billion by 2034. That reflects a staggering compound annual growth rate (CAGR) of 47.02%, highlighting just how critical APIs have become to modern tech. You can dig into more of the data in the full network API market analysis.
This rapid expansion has a direct effect on the job market. Companies aren't just looking for people who can write code; they're actively hunting for developers who can design, implement, and maintain solid API integrations. Working through a good API integration tutorial is your first step toward building these in-demand skills and becoming a truly valuable member of any dev team.
Preparing for a Flawless API Integration

Before you write a single line of code, remember that a successful connection always starts with a solid plan. Think of this prep work as your pre-flight checklist. It's a common mistake to jump straight into coding, but that almost always leads to frustrating roadblocks and wasted time.
A little bit of planning is what separates a smooth, predictable process from a chaotic one. It ensures you have all the information, tools, and environmental setup ready to go. This upfront work helps prevent the most common headaches developers run into during an API integration tutorial.
Dissecting API Documentation
Your first and most critical move is to become an expert on the API's documentation. Don't just skim it; dissect it. In my experience, high-quality documentation is a dead giveaway for a well-maintained and developer-friendly API.
Your mission here is to uncover the non-negotiable rules of engagement that will govern how your app talks to the service.
- Rate Limits: How many requests can you actually make per minute or per hour? Going over this limit will get you shut down with errors (like a
429 Too Many Requestsstatus code), so knowing this upfront is vital for building a resilient app. - Data Formats: Does the API expect requests and send responses in JSON or XML? Mismatched formats are an incredibly common and frustrating source of failed requests.
- Required Parameters: What information is absolutely mandatory for each endpoint? For example, fetching an employee's time-off requests will likely require an
employeeIdand a specific date range. - Error Codes: A good API will have its error responses well-documented. Understanding the difference between a
403 Forbiddenand a404 Not Foundwill make your debugging sessions so much faster.
Key Insight: Treat the API documentation as your contract with the provider. If you understand every clause—from rate limits to data structures—before you start building, you'll avoid nasty surprises and ensure your integration is stable from day one.
Choosing the Right API
Here's the thing: not all APIs are created equal. If you have a choice between multiple services offering similar features (like several weather data providers), you need to evaluate them on more than just functionality. The developer experience can vary wildly.
A powerful API with terrible documentation can be more trouble than it's worth. Here’s what I look for when I'm making a decision:
- Documentation Quality: Is it clear, comprehensive, and packed with practical code examples?
- Developer Support: Is there an active developer forum, a dedicated support channel, or a community Slack where you can get unstuck?
- Community and Reputation: What are other developers saying about it? A quick search can reveal common pain points or praise for its reliability.
Trust me, choosing an API with strong support and clear docs can save you dozens of hours of troubleshooting. This is a crucial part of any real-world API integration tutorial.
Setting Up Your Development Environment
With a chosen API and a deep understanding of its rules, the final piece of the puzzle is setting up a clean and effective development environment. This is your workshop, and having the right tools configured properly is non-negotiable for efficiency.
Start by installing any SDKs (Software Development Kits) the API owner provides. A good SDK can be a lifesaver, simplifying authentication and requests by giving you pre-written functions. This saves you from building everything from the ground up.
Next, get a tool like Postman configured. Postman is invaluable for that initial API exploration. It lets you send requests, inspect responses, and test authentication—all without writing a single line of application code. This lets you quickly confirm your credentials work and that you understand how to structure your calls correctly before you even think about integrating them into your Capacity-built application. This kind of sandboxed testing isolates problems early, making the whole process much smoother.
Mastering API Authentication and Security

Before your app can start pulling data or kicking off actions with an API, it needs to get past the front door. That's what authentication is all about—it's the secure handshake that proves your app is who it says it is and has permission to be there. Getting this right isn't just a good idea; it's a non-negotiable part of building a secure and trustworthy integration.
Think of it like a bouncer checking IDs at an exclusive club. Without the right credentials, you’re not getting in. In the API world, these credentials are what stand between you and a potential data breach. They prevent unauthorized use and make sure only your app is making the requests. This step is a cornerstone of any serious API integration tutorial.
Understanding Common Authentication Methods
APIs use a few different ways to handle authentication, each with its own quirks, use cases, and level of complexity. The method you end up using will depend on what the API provider offers and how sensitive the data you're working with is. Let's break down the most common ones you'll run into.
Deciding on the best authentication method for your API project is a critical early step. Each has its own strengths and is suited for different security needs. The table below compares the most common methods to help you make an informed choice.
Comparing Common API Authentication Methods
| Method | Best For | Complexity Level |
|---|---|---|
| API Key | Simple, public-facing APIs or low-risk operations where you just need to identify the calling application. | Low |
| Bearer Token | Most modern REST APIs that require a stateless, secure way to access protected resources. Great for server-to-server communication. | Medium |
| OAuth 2.0 | Applications needing to access a user's private data on their behalf without ever handling their password (e.g., "Log in with Google"). | High |
To recap, API Keys are your go-to for simple, low-risk scenarios. Bearer Tokens offer a solid middle-ground for most standard, secure API calls. And when you need to let users grant your app access to their data on another service, OAuth 2.0 is the industry standard you'll need to implement.
This need for secure, reliable connections is fueling some serious growth. The broader API management market was valued at USD 6.63 billion in 2024 and is on track to hit USD 51.11 billion by 2033. With everything from IoT devices to mobile apps relying on APIs, understanding this stuff is more important than ever. You can dig into the numbers in this comprehensive API management market report.
Securing Your Credentials the Right Way
One of the most common—and dangerous—mistakes a developer can make is hardcoding credentials like API keys or tokens directly into the source code. It's a massive security hole. If that code ever ends up in a public place, like a GitHub repository, your secrets are exposed for anyone to find and misuse.
The only professional way to handle this is with environment variables.
Environment variables are values that live outside your application's code, stored securely on the server or development machine. Your app then reads these variables when it runs. This simple practice creates a clean separation between your sensitive credentials and your codebase.
Here's how to do it properly:
- For Development: Create a
.envfile in your project's root directory. This file is where you'll store your keys. Crucially, you must add this file to your.gitignoreto make sure it's never committed to version control. - For Production: Nearly all modern hosting platforms and cloud providers (like Vercel, Netlify, or AWS) provide a secure dashboard where you can set environment variables for your live application.
Key Takeaway: Never, ever hardcode your credentials. Use a .env file for local development and your hosting provider's secret management tools for production. It’s the professional standard for a reason.This separation is a fundamental security practice. For a deeper look at this and other critical security measures, check out our guide on API development best practices.
Adopting this security-first mindset from the get-go is what separates a quick-and-dirty prototype from a robust, production-ready application. It ensures your integration is not only functional but also safe, reliable, and respectful of user data.
Alright, let's dive into making your first live API request. This is the moment where all the setup and theory pays off, and you actually see data flow from an external service right into your application. It’s the make-or-break point in any good api integration tutorial.
We'll use a common, real-world example to walk through this: fetching a list of products from a third-party e-commerce platform. The goal is straightforward—craft a request, send it out, and then figure out what to do with the data that comes back.
Assembling the Request
First things first, you need the right address. This is the request URL, or endpoint, which is the specific location that holds the data you're after. If you've been digging through the API's documentation, you’ll find something that looks like https://api.ecommercestore.com/v1/products.
With the address in hand, you need to decide how you're going to ask for the data. This is where HTTP methods come in. Since we just want to retrieve information, the correct method is GET. A GET request is essentially read-only; you're just asking for data without changing anything on the server. If we were adding a new product, we'd use a POST request instead.
The last piece of the puzzle is the request headers. These act like a cover letter for your request, providing critical metadata. You'll almost always need two:
- An
Authorizationheader with your API key or bearer token. - An
Acceptheader set toapplication/jsonto tell the server you want the data back in JSON format.
Key Insight: A solid API call is like a well-formed sentence. The endpoint is the noun (what you want), the HTTP verb is the action (what you're doing), and the headers are the adjectives, giving the server the context it needs to process your request correctly.
Sending the Request and Checking the Response
Time to send it off. Your app's HTTP client will fire the request to the endpoint. A moment later, the server will send a response. This response is a complete package: it includes a status code, its own set of headers, and the body (which contains the actual data).
Your first job is to check the HTTP status code. This one number tells you whether things went right or wrong. A 200 OK is the green light—everything worked. But you also need to prepare for other outcomes. A 401 Unauthorized means your API key is likely wrong, while a 404 Not Found suggests a typo in the endpoint URL. Building robust integrations means writing code that can handle these different scenarios gracefully.
This visual shows the basic lifecycle of every API call you'll make, from the initial request to processing what you get back.
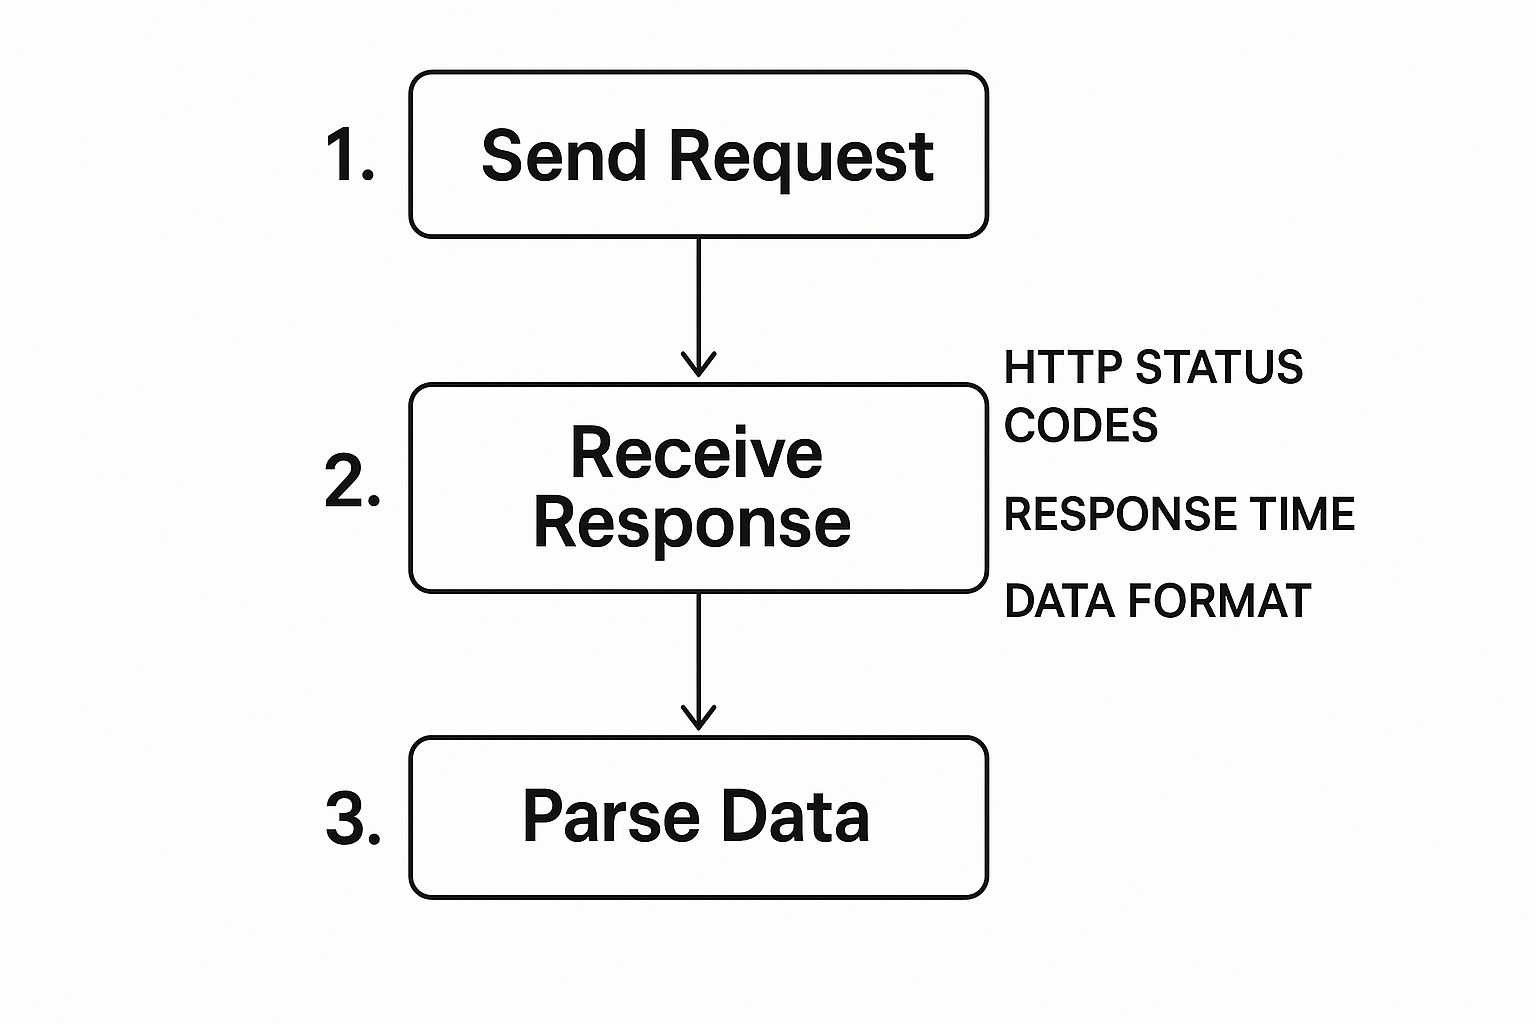
The diagram breaks the process down into its core stages, highlighting the crucial points where you need to check status codes and understand the data format before you can proceed.
Parsing the Data You Receive
If you got that 200 OK, you're ready for the final step: parsing the response body. Most modern APIs send data back in JSON (JavaScript Object Notation), a lightweight and human-readable format. Your application will need to take this JSON string and convert it into a native data structure you can actually work with, like an object or an array.
For our e-commerce example, the raw JSON response might look like this:
{ "products": [ { "id": "prod_123", "name": "Wireless Noise-Cancelling Headphones", "price": 249.99, "inStock": true }, { "id": "prod_456", "name": "Mechanical Keyboard", "price": 129.50, "inStock": false } ] }
Once this is parsed, you can easily pull out the information you need. You could loop through the products array to show each product's name and price in your app's UI, or check the inStock property to let the user know if an item is available.
This final step is what turns a raw text response into a real, useful feature in your Capacity-built application. Mastering this loop of requesting, receiving, and parsing is the key to any successful api integration tutorial and opens up a massive world of possibilities for what you can build.
Building Robust and Production-Ready Integrations
Making a successful API call feels great, but it's really just the beginning. The leap from a simple proof-of-concept to a professional, reliable application is a big one. To get there, you need to build integrations that are resilient, efficient, and easy to maintain. This is what truly separates a hobby project from a scalable, production-ready system your business can depend on.
These advanced practices are the bedrock of any solid API integration tutorial. They ensure your application doesn’t just work under perfect lab conditions but can handle the messy, unpredictable realities of the real world.
Implementing Smart Error Handling
Let's be real: APIs fail. It's not a question of if, but when. A service might go down for maintenance, hit an unexpected bug, or send back a response your code doesn't understand. If your application isn't built for this, it will crash, lose data, or create a seriously frustrating user experience.
This is where smart error handling becomes your safety net. It’s about writing code that anticipates failure and reacts intelligently. For instance, if you get a 503 Service Unavailable status code, your app shouldn't just throw its hands up and quit. A much better approach is to implement a retry mechanism, maybe with an "exponential backoff" strategy. This simply means your code waits a moment before trying again, and it increases the delay after each subsequent failure. This simple trick prevents you from hammering a service that's already struggling to recover.
Key Takeaway: A production-ready integration works from the assumption that things will go wrong. By building in robust error handling and retry logic from the start, you create a resilient application that can automatically recover from temporary glitches without needing someone to step in and fix it.
Efficiently Managing Large Data Sets with Pagination
What happens when your app asks an API for a list of all your users, and there are 100,000 of them? If the API tried to cram all of that into a single response, the request would almost certainly time out, or your application would choke on the sheer volume of data. This is precisely why pagination is so essential.
Pagination is just the process of breaking up a huge data set into smaller, bite-sized "pages." Instead of asking for everything at once, you might request the first 100 users. The API's response would include that first batch, along with instructions on how to ask for the next page, and the next, until you've got everything you need.
This technique is a lifesaver for a few reasons:
- Performance: Smaller responses are way faster to transfer and much easier for your application to process.
- Reliability: It prevents timeouts and dramatically reduces the risk of memory-related crashes.
- API Etiquette: You're respecting the server's resources and making it easier to stay within any rate limits.
Boosting Performance with Strategic Caching
Making the same API call for the exact same data over and over is a massive waste of resources. It slows down your application, eats up your API rate limit quota, and puts an unnecessary burden on the API provider's servers. The solution? Strategic caching.
Caching is a simple concept: you temporarily store the response from an API call locally. The next time you need that same piece of data, you can just grab it from your local cache instead of making a whole new network request. For example, if you're fetching a list of product categories that rarely change, you could cache that data for an hour or even a day.
This can dramatically improve your app's performance and make it feel incredibly responsive to the user. It's a fundamental technique you'll find in any guide to the best practices for web development.
The Importance of Logging and Monitoring
When an integration inevitably misbehaves, your first question will always be, "Why?" Without a clear record of what happened, you're basically debugging with a blindfold on. This is why comprehensive logging isn't a "nice-to-have"—it's a necessity.
You should be logging every single API request and response, including the endpoint, status code, and even the request body. This creates an invaluable audit trail for troubleshooting.
This level of monitoring and governance is a huge driver behind the growth of the API management market. Projections show this market ballooning from USD 7.82 billion in 2023 to an estimated USD 20.28 billion by 2030. That's a clear signal that businesses are investing heavily in making their API integrations bulletproof. You can learn more about what's fueling the demand for robust API management. Ultimately, these are the practices that transform a basic connection into a dependable, enterprise-grade solution.
Common API Integration Questions Answered
As you start connecting different services, you'll find that certain questions and hurdles pop up again and again. This section is your go-to reference for quick, actionable answers to some of the most common challenges you'll face during any API integration. Think of it as a curated FAQ to get you unstuck and back to building.
We’ll tackle the big questions that often trip up developers, from figuring out different API types to dealing with the inevitable roadblocks like rate limits. Getting these concepts down solidifies your foundation and sets you up for more complex projects down the road.
What Is the Difference Between REST and SOAP APIs?
This is a classic, and for good reason. The simplest way to think about it is that REST (Representational State Transfer) is a flexible architectural style, while SOAP (Simple Object Access Protocol) is a more rigid, official protocol.
Most modern APIs you'll encounter, especially for web and mobile apps, are REST APIs. They almost always use JSON over HTTP, which makes them lightweight, fast, and generally easier to work with. SOAP, on the other hand, uses XML for its messaging format and is known for its high security and strict standards. You'll often see it in enterprise settings like banking or telecom where transactional integrity is non-negotiable. For this guide and most of your projects, REST will be your focus.
How Do I Handle API Rate Limiting?
First thing to know: hitting a rate limit isn't an error. It's just the API enforcing its rules to ensure fair usage and prevent any single app from hogging all the resources. When you see a 429 Too Many Requests status code, the API is politely asking you to slow down.
The best way to manage this involves both proactive and reactive strategies:
- Cache Responses: If you're fetching data that doesn't change every second, store the response locally. This simple step can drastically cut down on redundant calls.
- Implement Exponential Backoff: If you do get rate-limited, don't just hammer the API again immediately. Your code should wait a moment, then retry. If it fails again, it should double the waiting period before the next attempt, and so on.
Before you write this logic from scratch, check the documentation for your client library. Many modern libraries can handle this for you automatically.
Key Insight: Rate limiting is an unavoidable part of working with APIs. The professional approach is to anticipate it by caching data and building intelligent retry logic into your application from the start. This prevents your app from being blocked and ensures a smoother user experience.
What Is an API Gateway and Do I Need One?
An API Gateway is basically a traffic cop for APIs. It's a management tool that acts as a single entry point for all client requests heading to various backend services. It sits in front of your APIs and handles crucial tasks like authentication, rate limiting, logging, and routing requests to the right microservice.
So, do you need one? If you're simply integrating a single third-party API into your Capacity application, then no, you don't need to build your own gateway. However, the API you are consuming is almost certainly sitting behind its own gateway. That's the tool enforcing the rate limits and authentication rules you have to follow. Understanding the concept is key, especially as your own applications grow more complex.
How Can I Test My API Integration Thoroughly?
Thorough testing is what separates a fragile integration from a rock-solid one. You can't just check if it works once and call it a day. A multi-layered approach is the only way to make sure it's truly production-ready.
Effective testing usually involves a few different stages:
- Manual Spot-Checks: Use a tool like Postman to fire off some quick requests and inspect the responses. This is perfect for initial exploration and for confirming that your authentication and request structures are correct.
- Automated Integration Tests: These are scripts that make real calls to a sandbox or test version of the API. Their job is to confirm that the end-to-end connection works as expected and hasn't been broken by recent changes on either side.
- Mocking the API in Unit Tests: This is where you test your app's logic without making slow, real-world network calls. You create a "mock" version of the API that can simulate various responses—successes, different types of errors, or even junk data.
This combination of testing makes sure your code is resilient enough to handle whatever the API decides to throw at it. For a deeper dive, exploring some fundamental software testing best practices will give you a solid foundation for building truly reliable applications.
Ready to stop dreaming and start building? With Capacity, you can turn your ideas into full-stack, production-ready web applications in minutes, not months. Describe your project in plain English, and let our advanced AI generate the code, UI, and infrastructure for you. It's 20x faster than traditional development, no coding experience required.